Ruby/Tk をすぐに活用したい人のために、ウィジェットの機能のサンプルプログラムを集めました。各スクリプトはスクリプト名から右クリックでダウンロードできます。
ボタンの属性の fg は文字色、bg は 背景色。activeforeground はボタンが選択されたときの文字色、activebackground はそのときの背景色。text はボタンの上に書かれる文字列、fill はボタンの幅の自動調節。anchor はボタンを上下左右のどの位置に固定するか。padx, pady はボタンの文字周囲の余白。relief はボタンの縁取り。width と height はボタンの幅と高さを表しています。command 属性にはボタンが押されたときの動作プログラムを proc オブジェクトとして割り当てます。
ファイル名: buttons.rb
require 'tk'

TkButton.new(nil, 'text'=>'fg & bg', 'fg'=>'red', 'bg'=>'white').pack
TkButton.new(nil, 'text'=>'active color', 'activeforeground'=>'white', 'activebackground'=>'red').pack
TkButton.new(nil, 'text'=>'fill').pack('fill'=>'x')
TkButton.new(nil, 'text'=>'anchor').pack('anchor'=>'w')
TkButton.new(nil, 'bitmap'=>'error').pack('anchor'=>'e')
TkButton.new(nil, 'text'=>'padx & pady', 'padx'=>20, 'pady'=>10).pack
TkButton.new(nil, 'text'=>'borderwidth', 'borderwidth'=>5).pack
TkButton.new(nil, 'text'=>'relief=>raised', 'relief'=>'raised').pack
TkButton.new(nil, 'text'=>'relief=>flat', 'relief'=>'flat').pack
TkButton.new(nil, 'text'=>'relief=>sunken', 'relief'=>'sunken').pack
TkButton.new(nil, 'text'=>'relief=>ridge', 'relief'=>'ridge').pack
TkButton.new(nil, 'text'=>'relief=>groove', 'relief'=>'groove').pack
TkButton.new(nil, 'text'=>'widht & height', 'width'=>20, 'height'=>2).pack
TkButton.new(nil, 'text'=>'EXIT', 'command'=>proc{exit}).pack

Tk.mainloop
属性はほとんどボタンと一緒です。ボタンの属性を憶えていれば Label や Entry など他のウィジェットに適用することができます。
ファイル名: labels.rb
require 'tk'

TkLabel.new(nil, 'text'=>'fg & bg', 'fg'=>'red', 'bg'=>'white').pack
TkLabel.new(nil, 'text'=>'fill').pack('fill'=>'x')
TkLabel.new(nil, 'text'=>'anchor').pack('anchor'=>'w')
TkLabel.new(nil, 'bitmap'=>'error').pack('anchor'=>'e')
TkLabel.new(nil, 'text'=>'padx & pady', 'padx'=>20, 'pady'=>10).pack
TkLabel.new(nil, 'text'=>'borderwidth', 'relief'=>'groove', 'borderwidth'=>5).pack
TkLabel.new(nil, 'text'=>'relief=>raised', 'relief'=>'raised').pack
TkLabel.new(nil, 'text'=>'relief=>flat', 'relief'=>'flat').pack
TkLabel.new(nil, 'text'=>'relief=>sunken', 'relief'=>'sunken').pack
TkLabel.new(nil, 'text'=>'relief=>ridge', 'relief'=>'ridge').pack
TkLabel.new(nil, 'text'=>'relief=>groove', 'relief'=>'groove').pack
TkLabel.new(nil, 'text'=>'widht & height', 'width'=>20, 'height'=>2).pack

Tk.mainloop
ボタンやラベルに bitmap 属性で張り付けることのできる組み込みのビットマップです。
ファイル名: bitmap.rb
require 'tk'

TkFrame.new{|f|
  TkLabel.new(f, 'bitmap'=>'error').pack('side'=>'left')
  TkLabel.new(f, 'text'=>'error').pack('side'=>'left')
}.pack('fill'=>'x')
TkFrame.new{|f|
  TkLabel.new(f, 'bitmap'=>'gray25').pack('side'=>'left')
  TkLabel.new(f, 'text'=>'gray25').pack('side'=>'left')
}.pack('fill'=>'x')
TkFrame.new{|f|
  TkLabel.new(f, 'bitmap'=>'gray50').pack('side'=>'left')
  TkLabel.new(f, 'text'=>'gray50').pack('side'=>'left')
}.pack('fill'=>'x')
TkFrame.new{|f|
  TkLabel.new(f, 'bitmap'=>'hourglass').pack('side'=>'left')
  TkLabel.new(f, 'text'=>'hourglass').pack('side'=>'left')
}.pack('fill'=>'x')
TkFrame.new{|f|
  TkLabel.new(f, 'bitmap'=>'info').pack('side'=>'left')
  TkLabel.new(f, 'text'=>'info').pack('side'=>'left')
}.pack('fill'=>'x')
TkFrame.new{|f|
  TkLabel.new(f, 'bitmap'=>'question').pack('side'=>'left')
  TkLabel.new(f, 'text'=>'question').pack('side'=>'left')
}.pack('fill'=>'x')
TkFrame.new{|f|
  TkLabel.new(f, 'bitmap'=>'questhead').pack('side'=>'left')
  TkLabel.new(f, 'text'=>'questhead').pack('side'=>'left')
}.pack('fill'=>'x')
TkFrame.new{|f|
  TkLabel.new(f, 'bitmap'=>'warning').pack('side'=>'left')
  TkLabel.new(f, 'text'=>'warning').pack('side'=>'left')
}.pack('fill'=>'x')

Tk.mainloop
ラジオボタンはチェックされたボタンの value 属性の値が文字列として、variable 属性に割り当てられた変数に代入されます。variable 属性に割り当てられた変数が同じボタンが複数個あればその中の1個の値だけが有効になります。variable 属性に変数を割り当てるためには、TkVariable.new で Tk 用の変数を作成する必要があります。下のサンプルスクリプトのようにラベル・ウィジェットの textvariable 属性に変数が登録されている場合、変数の内容が変更されるとその変更がすぐに表示に反映されます。
ファイル名: radiobuttons.rb
require 'tk'

n = TkVariable.new(0)

TkFrame.new{|f|
  TkRadiobutton.new(f, 'text'=>'one', 'value'=>1, 'variable'=>n).pack('anchor'=>'w')
  TkRadiobutton.new(f, 'text'=>'two', 'value'=>2, 'variable'=>n).pack('anchor'=>'w')
  TkRadiobutton.new(f, 'text'=>'three', 'value'=>3, 'variable'=>n).pack('anchor'=>'w')
}.pack

TkLabel.new(nil, 'textvariable'=>n, 'relief'=>'groove', 'padx'=>'4').pack

Tk.mainloop
チェックボタンがクリックされると、variable 属性に割り当てられた Tk 変数に、ボタンのチェックが on のときは、onvalue 属性の値が、off のときは offvalue 属性の値が代入されます。variable 属性に割り当てる変数は TkVariable.new メソッドで生成する必要があります。
ファイル名: checkbuttons.rb
require 'tk'

one = TkVariable.new(0)
two = TkVariable.new(0)
three = TkVariable.new(0)

TkFrame.new{|f|
  TkCheckbutton.new(f, 'text'=>'one', 'onvalue'=>1, 'offvalue'=>0, 'variable'=>one).pack('anchor'=>'w')
  TkCheckbutton.new(f, 'text'=>'two', 'onvalue'=>1, 'offvalue'=>0, 'variable'=>two).pack('anchor'=>'w')
  TkCheckbutton.new(f, 'text'=>'three', 'onvalue'=>1, 'offvalue'=>0, 'variable'=>three).pack('anchor'=>'w')
}.pack

TkFrame.new{|f|
  TkLabel.new(f, 'text'=>'one').pack('side'=>'left')
  TkLabel.new(f, 'textvariable'=>one, 'relief'=>'groove').pack('side'=>'right')
}.pack('fill'=>'x', 'anchor'=>'w')
TkFrame.new{|f|
  TkLabel.new(f, 'text'=>'two').pack('side'=>'left')
  TkLabel.new(f, 'textvariable'=>two, 'relief'=>'groove').pack('side'=>'right')
}.pack('fill'=>'x', 'anchor'=>'w')
TkFrame.new{|f|
  TkLabel.new(f, 'text'=>'three').pack('side'=>'left')
  TkLabel.new(f, 'textvariable'=>three, 'relief'=>'groove').pack('side'=>'right')
}.pack('fill'=>'x', 'anchor'=>'w')

Tk.mainloop
value メソッドで Entry ウィジェットのデータを利用することができます。ウィンドウを消した後でも Ruby の処理は続けたい場合は TkRoot.new.destroy を実行します。
ファイル名: entry.rb
require 'tk'

name = ''

TkLabel.new(nil, 'text'=>'Put your name below.').pack
entry = TkEntry.new.pack
TkButton.new(nil, 'text'=>'OK', 'command'=>proc{ name = entry.value; TkRoot.new.destroy }).pack
Tk.mainloop

puts "Hello, #{name}"
bind メソッドを使うとウィジェットに発生したイベントをトラップして処理することができます。次のサンプルスクリプトではマウスの矢印をラベルの上に持って来たり外したり、右ボタンや左ボタンを押したり離したりするとラベルの色が変わります。またラベルをダブルクリックすると表示文字が変わります。bind の書式は、ウィジェット.bind( 'イベント名', proc{ イベント処理 } ) です。
ファイル名: bind.rb
require 'tk'

label = TkLabel.new(nil, 'text'=>'test bind', 'relief'=>'ridge',  'padx'=>10, 'pady'=>10).pack('padx'=>40, 'pady'=>40)

label.bind('Enter', proc{ label.configure('bg'=>'orange') })
label.bind('Leave', proc{ label.configure('bg'=>'skyblue')})
label.bind('1', proc{ label.configure('bg'=>'yellow')})
label.bind('ButtonRelease-1', proc{ label.configure('bg'=>'green')})
label.bind('3', proc{ label.configure('bg'=>'brown')})
label.bind('ButtonRelease-3', proc{ label.configure('bg'=>'pink')})
label.bind('Double-ButtonPress-1', proc{ label.cget('text') == 'test bind'?label.configure('text'=>'bind test'):label.configure('text'=>'test bind')})

Tk.mainloop
bind で関係付けることのできるイベントには ASCII 文字一文字およびイベントパターンがあります。イベントパターンは次のような書式で記述します。その他ユーザ定義のイベントも利用できるようですがここでは省略します。
<modifier-modifier-type-detail>
上の書式で例えば Double-Button-1 はマウスの左ボタンをダブルクリックしたときのイベントを表します。
modifier には次のようなものがあります。
Control Mod2, M2
Shift Mod3, M3 Lock Mod4, M4
Button1, B1 Mod5, M5 Button2, B2 Meta, M
Button3, B3 Alt
Button4, B4 Double
Button5, B5 Triple
Mod1, M1
type には次のようなものがあります。
ButtonPress, Button, Expose, Map
ButtonRelease, FocusIn, Motion
Circulate, FocusOut, Property
Colormap, Gravity, Reparent
Configure, KeyPress, Key, Unmap
Destroy, KeyRelease, Visibility
Enter, Leave, Activate
Deactivate
detail は英数字1文字で、キーの種類やボタンの種類を表します。例えば KeyPress-a は a キーが押されたことを。ButtonPress-1 はマウスの左ボタンが押されたことを示します。
なんとスクロールバーつきテキストウィジェットが5行で書けてしまいます。スクロールバー・ウィジェットは fill 属性を指定しておかないとうまく働きません。スクロールバーとテキスト・ウィジェットを連動させるのには、xscrollbar または yscrollbar メソッドを利用します。
ファイル名: text.rb
require 'tk'

scr = TkScrollbar.new.pack('fill'=>'y', 'side'=>'right')
text = TkText.new.pack('side'=>'right')
text.yscrollbar( scr )

Tk.mainloop
リストボックスに項目を登録するためには insert メソッドを利用します。使い方は、リストウィジェット.insert( インデックス, 項目名) というふうになります。選択されたリストの情報のとりだしは curselection メソッドを使います。
ファイル名: listbox.rb
require 'tk'

f = TkFrame.new.pack
scr = TkScrollbar.new(f).pack('side'=>'right', 'fill'=>'y')
list = TkListbox.new(f).pack('side'=>'right')

list.yscrollbar( scr )
for i in 0..20
  list.insert(i, 'item ' + i.to_s )
end

label = TkLabel.new(nil, 'text'=>'no item is selected').pack
list.bind('ButtonRelease-1', proc{ label.text 'index ' + list.curselection.to_s + ' is selected' })

Tk.mainloop
Tkmenubar というクラスを使うとメニューの定義は実質メニューの設計図となる多次元配列を記述するだけとなります。下のスクリプトは Kero さんの Ruby/Tk Tutorial からの引用です。
ファイル名: tkmenubar.rb
require 'tk'

menu_spec = [
  [ ['File', 0],
    ['New File',  proc{new_file}],
    ['Open File', proc{open_file}],
    '---',
    ['Save File', proc{save_file}],
    ['Save As',   proc{save_as}],
    '---',
    ['Quit',      proc{exit}]
  ],
  [ ['Edit', 0],
    ['Cut',       proc{cut_text}],
    ['Copy',      proc{copy_text}],
    ['Paste',     proc{paste_text}]
  ]
]
TkMenubar.new(nil, menu_spec, 'tearoff'=>false).pack('fill'=>'x', 'side'=>'top')

Tk.mainloop
メッセージボックスの記述は1行プログラムです。
ファイル名: message.box
require 'tk'

TkButton.new(nil, 'text'=>'messageBox', 'command'=>proc{ Tk.messageBox( 'message'=>'Really quit?')}).pack

Tk.mainloop
警告ボックスの記述は、警告メッセージを引数にして TkWarning クラスのオブジェクトを作成します。Ok ボタンをクリックすると 0 を返しますが、その値は value メソッドで取り出すことができます。
ファイル名: warning.rb
require 'tk'

def warning( msg )
  ret_value = TkWarning.new('Watch out!!').value
  msg.text( ret_value )
end

msg = TkMessage.new.pack
TkButton.new(nil, 'text'=>'show warning', 'command'=>proc{ warning(msg) }).pack

Tk.mainloop
ダイアログボックスを記述するには、TkDialog クラスを利用します。message 属性にメッセージを、buttons 属性にボタン名をスペースで区切った文字列を割り当てます。bitmap 属性には 記号を、default 属性にはリターンキーを押したときに選択されるボタンを指定できます。TkDialog クラスの value メソッドを使うと、どのボタンが押されたかを知ることができます。左端から 0, 1, .. と値が帰ります。
ファイル名: dialog.rb
require 'tk'

def warning( msg )
  ret_value  = TkDialog.new('message'=>'Really quit?', 'buttons'=>'Ok Cancel', 'default'=>1, 'bitmap'=>'warning').value
  msg.text( ret_value )
end

msg = TkMessage.new.pack
TkButton.new(nil, 'text'=>'show dialog', 'command'=>proc{ warning(msg) }).pack

Tk.mainloop
ファイルオープンのダイアログも簡単。Tk.getOpenFile メソッドを使います。戻り値がファイルのフルパス名になります。
ファイル名: getOpenFile.rb
require 'tk'

def getfile( msg )
  file = Tk.getOpenFile
  msg.text( file )
end

msg = TkMessage.new.pack
TkButton.new(nil, 'text'=>'get file name', 'command'=>proc{ getfile(msg) }).pack

Tk.mainloop
ファイルのセーブの時は Tk.getSaveFile メソッドを使います。
ファイル名: getSaveFile.rb
require 'tk'

def getfile( msg )
  file = Tk.getSaveFile
  msg.text( file )
end

msg = TkMessage.new.pack
TkButton.new(nil, 'text'=>'get file name', 'command'=>proc{ getfile(msg) }).pack

Tk.mainloop
色を選択するダイアログは Tk.chooseColor メソッドを使います。
ファイル名: chooseColor.rb
require 'tk'

def getfile( msg )
  file = Tk.chooseColor
  msg.text( file )
end

msg = TkMessage.new.pack
TkButton.new(nil, 'text'=>'color pick', 'command'=>proc{ getfile(msg) }).pack

Tk.mainloop
便利なダイアログですが、自前で用意したいときもあります。ルートウィンドウの他に新しいウィンドウを作るには TkToplevel クラスを使います。
ファイル名: toplevel.rb
require 'tk'

TkButton.new(nil, 'text'=>'new window', 'command'=>proc{ new_window }).pack

def new_window
  w = TkToplevel.new
  TkLabel.new(w, 'text'=>'new window', 'padx'=>10, 'pady'=>10).pack
  TkButton.new(w, 'text'=>'dismiss', 'command'=>proc{ w.destroy }).pack
end

Tk.mainloop
メニューとダイアログの応用です。ファイルの読み書きとカット・アンド・ペーストしかできないエディターです。使い方の説明はいらないと思います。
ファイル名: edit.rb
require 'tk'

fbar = TkFrame.new.pack('fill'=>'x')
scr = TkScrollbar.new.pack('fill'=>'y', 'side'=>'right')
text = TkText.new.pack('side'=>'right')
text.yscrollbar( scr )
cut_buffer = ''

def open_file ( text )
  filename = Tk.getOpenFile
  file = open( filename )
    textdata = file.read
  file.close
  text.insert( 'end', textdata )
end

def save_file ( text )
  filename = Tk.getSaveFile
  textdata = text.get( '1.0','end' )
  file = open( filename, "w" )
    file.print( textdata )
  file.close
end

menu_spec = [
  [ ['File', 0],
    ['Open File', proc{open_file text}],
    ['Save File', proc{save_file text}],
    '---',
    ['Clear',  proc{ text.delete('1.0', 'end') }],
    '---',
    ['Quit',      proc{exit}]
  ],
  [ ['Edit', 0],
    ['Cut',       proc{ cut_buffer = text.get('sel.first', 'sel.last'); text.delete('sel.first', 'sel.last') }],
    ['Copy',      proc{ cut_buffer = text.get('sel.first', 'sel.last') }],
    ['Paste',     proc{ text.insert('insert',cut_buffer ) }]
  ]
]
TkMenubar.new(fbar, menu_spec, 'tearoff'=>false).pack('fill'=>'x', 'side'=>'top')

Tk.mainloop
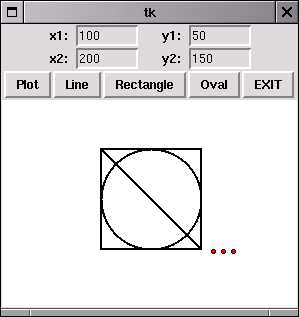
Tk にはキャンバスという高機能のグラフィックスのためのウィジェットがあります。キャンバス上でオブジェクトをグリグリ動かすプログラムも簡単にできるようですが、次のサンプルで使った TkcLine, TkcRectangle, TkcOval の3つのクラスを知っているだけでもプログラムで図形を描いたりグラフをプロットしたりできます。
これらのメソッドの使い方は簡単で、最初に c = TkCanvas.new でキャンバスオブジェクトを生成し、例えば線を引く場合 TkcLine.new(c, x1, y1, x2, y2, 'width'=>2 ) のように引数に、キャンバスオブジェクト、始点の x 座標、始点の y 座標、終点の x 座標、 終点の y 座標、線幅 を与えるだけです。これだけを知っているだけで BASIC でやっていたような簡単な図形を作って楽しむことができます。
実行例
グラフィックス練習プログラム canvas.rb
require 'tk'

x1 = TkVariable.new
y1 = TkVariable.new
x2 = TkVariable.new
y2 = TkVariable.new

TkFrame.new{|f|
  TkLabel.new(f,'text'=>'x1: ').pack('side'=>'left')
  TkEntry.new(f,'width'=>8, 'textvariable'=>x1 ).pack('side'=>'left')
  TkLabel.new(f,'text'=>'     y1: ').pack('side'=>'left')
  TkEntry.new(f,'width'=>8, 'textvariable'=>y1 ).pack('side'=>'left')
}.pack
TkFrame.new{|f|
  TkLabel.new(f,'text'=>'x2: ').pack('side'=>'left')
  TkEntry.new(f,'width'=>8, 'textvariable'=>x2 ).pack('side'=>'left')
  TkLabel.new(f,'text'=>'     y2: ').pack('side'=>'left')
  TkEntry.new(f,'width'=>8, 'textvariable'=>y2 ).pack('side'=>'left')
}.pack

c = TkCanvas.new(nil, 'background'=>'white' )

TkFrame.new{|f|
  TkButton.new(f,'text'=>'Plot', 'command'=>proc{ TkcOval.new(c, x1.to_i, y1.to_i, x1.to_i + 4, y1.to_i + 4, 'fill'=>'red')  }).pack('side'=>'left')
  TkButton.new(f,'text'=>'Line', 'command'=>proc{ TkcLine.new(c, x1.to_i, y1.to_i, x2.to_i, y2.to_i, 'width'=>2 ) }).pack('side'=>'left')
  TkButton.new(f,'text'=>'Rectangle', 'command'=>proc{ TkcRectangle.new(c, x1.to_i, y1.to_i, x2.to_i, y2.to_i, 'width'=>2 ) }).pack('side'=>'left')
  TkButton.new(f,'text'=>'Oval', 'command'=>proc{ TkcOval.new(c, x1.to_i, y1.to_i, x2.to_i, y2.to_i, 'width'=>2 ) }).pack('side'=>'left')
  TkButton.new(f,'text'=>'EXIT', 'command'=>proc{exit}).pack('side'=>'left')
}.pack

c.pack

Tk.mainloop
キャンバスに文字列を表示するには TkcText オブジェクトを使います。書式は下のスクリプトを参考にしてください。
ファイル名: tkctext.rb
require 'tk'

c = TkCanvas.new.pack
x1, y1 = 150, 50
TkcText.new(c, x1, y1, 'text'=>'hello, world', 'anchor'=>'w')
TkcText.new(c, x1, y1+20, 'text'=>'hello, world', 'anchor'=>'center')
TkcText.new(c, x1, y1+40, 'text'=>'hello, world', 'anchor'=>'e')

Tk.mainloop
図形オブジェクトをマウスで動かすこともできます。次のスクリプトを itembind.rb に作成して、ruby itembind.rb で動かしてみてください。円形のオブジェクトをマウスで動かして遊ぶことができます。TkMove クラスだけを別のファイルにすると再利用ができます( tkmove.rb にリンクしてあります)。
ファイル名: itembind.rb
TkMove クラスのファイル名:tkmove.rb
require 'tk'

class TkMove
  def initialize( canvas, tag )
    canvas.itembind(tag,'1',proc{|x,y| self.plotDown canvas, x, y }, "%x %y")
    canvas.itembind(tag, 'B1-Motion',proc{|x,y| self.plotMove canvas, x, y }, "%x %y")
    @lastx, @lasty = 0, 0
  end
  def plotDown (w, x, y)
    w.dtag 'selected'
    w.addtag_withtag 'selected', 'current'
    w.raise 'current'
    @lastx, @lasty = x, y
  end

  def plotMove (w, x, y)
    w.move 'selected', x - @lastx, y - @lasty
    @lastx, @lasty = x, y
  end
end

c = TkCanvas.new.pack

m = TkMove.new(c, 'circle')
c.itembind('circle','Any-Enter',proc{c.itemconfigure 'current','fill','blue'})
c.itembind('circle','Any-Leave',proc{c.itemconfigure 'current','fill','red'})


TkcOval.new(c, 130, 70, 160, 100, 'fill'=>'red').addtag('circle')

Tk.mainloop
tkmove.rb の使い方をしめすサンプルプログラムです。require 'tkmove.rb' したあと TkMove.new( キャンバスオブジェクト, 'アイテムのタグ名' )を実行するだけでアイテムをマウスでグリグリ動かせます。
ファイル名: use_tkmove.rb
require 'tk'
require 'tkmove.rb'

c = TkCanvas.new.pack
TkMove.new(c, 'circle')

TkcOval.new( c, 130, 80, 160, 110, 'fill'=>'red' ).addtag('circle')

Tk.mainloop
上の tkmove.rb を利用して canvas.rb の図形を動かせるようにしました。Ruby は(Tk のおかげで)グラフィックスも超簡単です。canvas2.rb を動かすときは、tkmove.rb も必要です。
ファイル名: canvas2.rb
require 'tk'
require 'tkmove.rb'

x1 = TkVariable.new
y1 = TkVariable.new
x2 = TkVariable.new
y2 = TkVariable.new

TkFrame.new{|f|
  TkLabel.new(f,'text'=>'x1: ').pack('side'=>'left')
  TkEntry.new(f,'width'=>8, 'textvariable'=>x1 ).pack('side'=>'left')
  TkLabel.new(f,'text'=>'     y1: ').pack('side'=>'left')
  TkEntry.new(f,'width'=>8, 'textvariable'=>y1 ).pack('side'=>'left')
}.pack
TkFrame.new{|f|
  TkLabel.new(f,'text'=>'x2: ').pack('side'=>'left')
  TkEntry.new(f,'width'=>8, 'textvariable'=>x2 ).pack('side'=>'left')
  TkLabel.new(f,'text'=>'     y2: ').pack('side'=>'left')
  TkEntry.new(f,'width'=>8, 'textvariable'=>y2 ).pack('side'=>'left')
}.pack

c = TkCanvas.new(nil, 'background'=>'white' )
TkMove.new(c, 'grph')

TkFrame.new{|f|
  TkButton.new(f,'text'=>'Plot', 'command'=>proc{ item = TkcOval.new(c, x1.to_i, y1.to_i, x1.to_i + 10, y1.to_i + 10, 'fill'=>'red'); item.addtag 'grph'  }).pack('side'=>'left')
  TkButton.new(f,'text'=>'Line', 'command'=>proc{ item = TkcLine.new(c, x1.to_i, y1.to_i, x2.to_i, y2.to_i, 'width'=>2 ); item.addtag 'grph' }).pack('side'=>'left')
  TkButton.new(f,'text'=>'Rectangle', 'command'=>proc{ item = TkcRectangle.new(c, x1.to_i, y1.to_i, x2.to_i, y2.to_i, 'width'=>2 ); item.addtag 'grph' }).pack('side'=>'left')
  TkButton.new(f,'text'=>'Oval', 'command'=>proc{ item = TkcOval.new(c, x1.to_i, y1.to_i, x2.to_i, y2.to_i, 'width'=>2 ); item.addtag 'grph' }).pack('side'=>'left')
  TkButton.new(f,'text'=>'EXIT', 'command'=>proc{exit}).pack('side'=>'left')
}.pack

c.pack

Tk.mainloop
関数のグラフをプロットすることもできます。tkmove.rb を使っているのでプロットしたグラフをマウスで動かすことができます。
ファイル名: sin.rb
require 'tk'
require 'tkmove.rb'

c = TkCanvas.new.pack
TkcText.new(c, 140, 20, 'text'=>'sin(x)')
TkcLine.new(c, 50, 100, 230, 100)
TkcLine.new(c, 50, 20, 50, 180)
plot_data = [50,100]
for i in 1..180
  x1, y1 = 50 + i, 100 - 50 * Math.sin( i / 90.0 * Math::PI)
  plot_data += [x1, y1]
end
eval( "TkcLine.new(c," + plot_data.join(',')+ ", 'width'=>2 ).addtag('item')" )

move = TkMove.new( c, 'item' )

Tk.mainloop
マウスカーソルの x 座標、y 座標は %x, %y で取り出せます。つぎのサンプルプログラムを走らせてキャンバス上でマウスをドラッグしてみてください。
ファイル名: motion.rb
require 'tk'

f = TkFrame.new.pack
lx = TkLabel.new(f, 'relief'=>'ridge', 'width'=>6).pack('side'=>'left')
ly = TkLabel.new(f, 'relief'=>'ridge', 'width'=>6).pack('side'=>'left')

c = TkCanvas.new.pack
c.bind('B1-Motion', proc{|x, y| lx.text( x.to_s ); ly.text( y.to_s )}, "%x %y")

Tk.mainloop
アイテムの位置情報は coords メソッドで変更することができます。次のサンプルを起動した後キャンバスをマウスの右ボタンでドラッグしてください。
ファイル名: coords.rb
require 'tk'

c = TkCanvas.new.pack
c.bind( 'B1-Motion', proc{|x, y| elongate_line( c, x, y ) }, "%x %y" )

def elongate_line( c, x, y )
  c.coords('line', 30, 30, x, y )
end

TkcLine.new(c, 30, 30, 50, 30, 'width'=>2 ).addtag('line')

Tk.mainloop
マウスで矩形を描くスクリプトです
ファイル名: box.rb
require 'tk'

c = TkCanvas.new.pack
c.bind( '1', proc{|x, y| $id = create_box(c, x, y) }, "%x %y")
c.bind( 'B1-Motion', proc{|x, y| adjust_box( c, x, y ) }, "%x %y" )

$x0, $y0 = 0, 0
def create_box(c, x, y)
  box = TkcRectangle.new(c, x, y, x, y, 'width'=>2)
  c.dtag 'selected'
  c.addtag_withtag 'selected', box.id
  $x0, $y0 = x, y
end
def adjust_box( c, x, y )
  c.coords('selected', $x0, $y0, x, y )
end

Tk.mainloop
上のプログラムで作成したアイテムを今度はマウスで移動したいと言う場合、bind の競合が起こります。bind を有効にしたり無効にしたりできると便利です。bind を無効にするには bind の引数に空の Proc オブジェクトを与えるとできます。tkmove.rb を改造して bind が無効にできるようにしました。つぎのふたつのスクリプトをダウンロードして ruby testmove2.rb で試してください。
プログラム名: tkmove2.rb
class TkMove
  def initialize( canvas, tag )
    @lastx, @lasty = 0, 0
    bind( canvas, tag )
  end
  def bind( canvas, tag )
    canvas.itembind(tag,'1',proc{|x,y| self.plotDown canvas, x, y }, "%x %y")
    canvas.itembind(tag, 'B1-Motion',proc{|x,y| self.plotMove canvas, x, y }, "%x %y")
  end
  def unbind( canvas, tag )
    canvas.itembind(tag, '1', proc{})
    canvas.itembind(tag, 'B1-Motion', proc{})
  end
  def plotDown (w, x, y)
    w.dtag 'selected'
    w.addtag_withtag 'selected', 'current'
    w.raise 'current'
    @lastx, @lasty = x, y
  end

  def plotMove (w, x, y)
    w.move 'selected', x - @lastx, y - @lasty
    @lastx, @lasty = x, y
  end
end
プログラム名: testmove2.rb
require'tk'
require'tkmove2.rb'

c = TkCanvas.new.pack
f = TkFrame.new.pack
mv = TkMove.new(c, 'circle')

TkcOval.new(c, 70, 50, 90, 70, 'fill'=>'red').addtag('circle')

TkButton.new(f, 'text'=>'unbind', 'command'=>proc{ mv.unbind( c, 'circle') }).pack('side'=>'left')
TkButton.new(f, 'text'=>'bind', 'command'=>proc{ mv.bind( c, 'circle') }).pack('side'=>'left')
Tk.mainloop
box.rb に tkmove2.rb を導入して描いた矩形を動かせるようにしました。
ファイル名: box2.rb
require 'tk'
require 'tkmove2.rb'

def bind( c )
  c.bind( '1', proc{|x, y| $id = create_box(c, x, y) }, "%x %y")
  c.bind( 'B1-Motion', proc{|x, y| adjust_box( c, x, y ) }, "%x %y" )
end

def unbind( c )
  c.bind( '1', proc{} )
  c.bind( 'B1-Motion', proc{} )
end

$x0, $y0 = 0, 0
def create_box(c, x, y)
  box = TkcRectangle.new(c, x, y, x, y, 'width'=>2)
  box.addtag('box')
  c.dtag 'selected'
  c.addtag_withtag 'selected', box.id
  $x0, $y0 = x, y
end
def adjust_box( c, x, y )
  c.coords('selected', $x0, $y0, x, y )
end

c = TkCanvas.new.pack
f = TkFrame.new.pack
m = TkMove.new(c, 'box')
m.unbind(c, 'box')
bind(c)

TkButton.new(f,'text'=>'Draw', 'command'=>proc{ bind( c ); m.unbind(c, 'box')}).pack('side'=>'left')
TkButton.new(f,'text'=>'Move', 'command'=>proc{ unbind( c ); m.bind(c, 'box')}).pack('side'=>'left')

Tk.mainloop
キャンバスのアイテムを作成するスクリプトとアイテムを動かすスクリプトをクラスにしました。ちょっと図形を作って利用したいと言うときに使い回しができると思います。使い方は ruby draw2.rb で起動した後ボタンを先ず押してから、マウスでキャンバスに絵を描いてください。
ファイル名: draw2.rb
require 'tk'

class TkMove
  def initialize( canvas )
    @x0, @y0 = 0, 0
    @canvas = canvas
    @tag = 'item'
  end

  def bind
    @canvas.itembind( @tag, '1', proc{|x, y| plotDown x, y},"%x %y")
    @canvas.itembind( @tag, 'B1-Motion', proc{|x, y| plotMove x, y},"%x %y")
  end
  def unbind
    @canvas.itembind( @tag, '1', proc{} )
    @canvas.itembind( @tag, 'B1-Motion', proc{} )
  end

  def plotDown(x, y)
    @canvas.dtag 'selected'
    @canvas.addtag_withtag 'selected', 'current'
    @canvas.raise 'current'
    @x0, @y0 = x, y
  end
  def plotMove(x, y)
    @canvas.move 'selected', x - @x0, y - @y0
    @x0, @y0 = x, y
  end
end

class TkDraw
  def initialize( canvas )
    @canvas = canvas
    @tag = 'item'
    @type = 'default'
    @x0, @y0 = 0, 0
  end

  def bind
    @canvas.bind('1', proc{|x, y| create_item(x, y)}, "%x %y")
    @canvas.bind('B1-Motion', proc{|x, y| adjust_item(x, y)}, "%x %y")
  end
  def unbind
    @canvas.bind('1', proc{})
    @canvas.bind('B1-Motion', proc{})
  end

  def create_item(x, y)
    @item = new_item(x, y)
    @item.addtag( @tag )
    @canvas.dtag 'selected'
    @canvas.addtag_withtag 'selected', @item.id
    @x0, @y0 = x, y
  end
  def new_item(x, y)
    'not defined'
  end
  def adjust_item(x, y)
    @item.coords( @x0, @y0, x, y )
  end
end

class TkdLine < TkDraw
  def initialize( canvas )
    super
    @type = 'line'
  end
  def new_item(x, y)
    TkcLine.new( @canvas, x, y, x, y, 'width'=>2 )
  end
end

class TkdRectangle < TkDraw
  def initialize( canvas )
    super
    @type = 'rectangle'
  end
  def new_item(x, y)
    TkcRectangle.new( @canvas, x, y, x, y, 'fill'=>'white' )
  end
end

class TkdOval < TkDraw
  def initialize( canvas )
    super
    @type = 'oval'
  end
  def new_item(x, y)
    TkcOval.new( @canvas, x, y, x, y, 'fill'=>'red' )
  end
end

class TkDelete
  def initialize( canvas )
    @canvas = canvas
    @tag = 'item'
  end

  def bind
    @canvas.itembind( @tag, '1', proc{ delete } )
    @canvas.itembind( @tag, 'B1-Motion', proc{} )
  end
  def unbind
    @canvas.itembind( @tag, '1', proc{} )
    @canvas.itembind( @tag, 'B1-Motion', proc{} )
  end

  def delete
    @canvas.delete('current')
  end
end

# main routine #

c = TkCanvas.new.pack
m = TkMove.new( c )
l = TkdLine.new( c )
r = TkdRectangle.new( c )
o = TkdOval.new( c )
d = TkDelete.new( c )

TkFrame.new{|f|
  TkButton.new(f, 'text'=>'Lin', 'command'=>proc{m.unbind; l.bind}).pack('side'=>'left')
  TkButton.new(f, 'text'=>'Rct', 'command'=>proc{m.unbind; r.bind}).pack('side'=>'left')
  TkButton.new(f, 'text'=>'Ovl', 'command'=>proc{m.unbind; o.bind}).pack('side'=>'left')
  TkButton.new(f, 'text'=>'Mv', 'command'=>proc{l.unbind; m.bind}).pack('side'=>'left')
  TkButton.new(f, 'text'=>'Del', 'command'=>proc{l.unbind; m.unbind; d.bind}).pack('side'=>'left')
  TkButton.new(f, 'text'=>'Bye', 'command'=>proc{exit}).pack('side'=>'left')
}.pack

Tk.mainloop
キャンバスのアイテムを操作するのに Tk では引数に tag を使います。この tag のおかげで複数のアイテムを一つのアイテムのように扱うことができます。一つのアイテムに複数の tag を登録することができるので、階層的な tag の使い方ができます。下のサンプルプログラムを起動すると、白い矩形アイテムに赤いアイテムが重なったものと、黄色い円形のアイテム、青いアイテムが表示されます。白と赤のアイテムをマウスでドラッグするとまるで一つのアイテムのように一緒に動きます。青いアイテムもマウスで移動できます。ところが、黄色いアイテムをドラッグすると他のアイテムも全て動いてしまいます。これは赤白のアイテムは 'item' 'g1' という二つの tag を、青いアイテムは 'item' と 'g2' を、黄色いアイテムは 'item' だけの tag をもっているからです。マウスのドラッグでは一番後ろの tag が発動するようにプログラムしたので、赤白のアイテムでは 'g1' が、青のアイテムでは 'g2' が、黄色のアイテムでは 'item' が発動し上に述べたような移動が起きたのです。
ファイル名: tag.rb
require 'tk'

class TkMove
  def initialize( canvas )
    @x0, @y0 = 0, 0
    @canvas = canvas
    @tag = 'item'
  end

  def bind
    @canvas.itembind( @tag, '1', proc{|x, y| plotDown x, y},"%x %y")
    @canvas.itembind( @tag, 'B1-Motion', proc{|x, y| plotMove x, y},"%x %y")
  end
  def unbind
    @canvas.itembind( @tag, '1', proc{} )
    @canvas.itembind( @tag, 'B1-Motion', proc{} )
  end

  def plotDown(x, y)
    @canvas.dtag 'selected'
    tag = @canvas.gettags('current')[-2]
    @canvas.addtag_withtag 'selected', tag
    @canvas.raise tag
    @x0, @y0 = x, y
  end
  def plotMove(x, y)
    @canvas.move 'selected', x - @x0, y - @y0
    @x0, @y0 = x, y
  end
end

c = TkCanvas.new.pack
m = TkMove.new( c )
m.bind

x1, y1 = 100, 100
item1 = TkcRectangle.new(c, x1-15, y1-15, x1+15, y1+15, 'fill'=>'white')
item1.addtag('item'); item1.addtag('g1')
x2, y2 = 100, 100
item1 = TkcOval.new(c, x2-10, y2-10, x2+10, y2+10, 'fill'=>'red')
item1.addtag('item'); item1.addtag('g1')
x3, y3 = 150, 100
item1 = TkcOval.new(c, x3-10, y3-10, x3+10, y3+10, 'fill'=>'yellow')
item1.addtag('item')
x4, y4 = 200, 100
item1 = TkcOval.new(c, x4-10, y4-10, x4+10, y4+10, 'fill'=>'blue')
item1.addtag('item'); item1.addtag('g2')
Tk.mainloop
最終修正(2002/5/18)